ref. https://riverpod.dev/ko/docs/essentials/side_effects
부가 작업 수행(Performing side effects) | Riverpod
지금까지는 데이터를 가져오는 방법(일명 GET HTTP 요청 수행)만 살펴봤습니다.
riverpod.dev
The problem is, how do we update the state of a provider from within a consumer?
Naturally, providers do not expose a way to modify their state. This is by design, to ensure that the state is only modified in a controlled way and promote separation of concerns.
Instead, providers have to explicitly expose a way to modify their state.
...
To do that, we will use a new concept: Notifiers. we will need to modify our provider such that they expose a public API for modifying their state. This is done by converting our provider into what we call a "notifier". Notifiers are the "stateful widget" of providers. They require a slight tweak to the syntax for defining a provider.
Provider는 데이터 혹은 메서드를 여러 위젯에서 엑세스 가능하도록 노출(expose) 하기 위해 사용된다.
노출된 Provider는 ref 라는 객체로 엑세스 할 수 있다.
ref 생성자의 파라미터로 전달받아서 사용하기도 하고,
NotifierProvider 나 Consumer 위젯 처럼 아예 class 의 property 로 내장된 경우도 있다.
// Notifier & NotifierProvider 조합의 기본 syntax
final name = SomeNotifierProvider.someModifier<MyNotifier, Result>(MyNotifier.new);
class MyNotifier extends SomeNotifier<Result> {
@override
Result build() {
<your logic here>
}
<your methods here>
}
Notifier 를 통한 데이터의 변경
import 'dart:async';

import 'package:flutter/material.dart';
import 'package:flutter_riverpod/flutter_riverpod.dart';

class ButtonNotifier extends AutoDisposeAsyncNotifier<int> {
  late int count;
  @override
  FutureOr<int> build() {
    count = 5;
    return count;
  }

  Future<void> pressBtn() async {
    state = const AsyncValue.loading();
    await Future.delayed(const Duration(seconds: 1));
    count++;
    // print(count);
    state = AsyncData(count);
  }
}

final buttonProvider = AutoDisposeAsyncNotifierProvider<ButtonNotifier, int>(
  () => ButtonNotifier(),
);

// ###################### view ###################################
class RiverpodTestScreen extends ConsumerStatefulWidget {
  static String routePath = "/lab/test";
  static String routeName = "test";
  const RiverpodTestScreen({super.key});

  @override
  ConsumerState<ConsumerStatefulWidget> createState() =>
      _RiverpodTestScreenState();
}

class _RiverpodTestScreenState extends ConsumerState<RiverpodTestScreen> {
  void _countUp() {
    ref.read(buttonProvider.notifier).pressBtn();
  }

  @override
  Widget build(BuildContext context) {
    ref.watch(buttonProvider);
    final state = ref.watch(buttonProvider.notifier).state;
    return Scaffold(
      appBar: AppBar(),
      body: Center(
        child: TextButton(
          child: Text("state: ${state}"),
          onPressed: () => _countUp(),
        ),
      ),
    );
  }
}
위의 코드는 이해를 위해 작성한 전체 코드이다.
Provider 가 정의된 파일과 화면을 렌더링하는 위젯이 정의된 파일을 따로 두는 게 일반적이지만,
편의상 같은 파일로 작성하였다.
TextButton 을 누르면 onPressed 의 콜백함수인 _countUp() 함수가 실행된다.
_countUp() 함수는 UI 를 렌더링하는 RiverpodTestScreen 위젯의 private method 로,
ref.read(buttonProvider.notifier) 를 통해 NotifierProvider 인 buttonProvider 가 노출하는 notifier 인 ButtonNotifier 에 엑세스, .pressBtn() 으로 ButtonNotifier 의 pressBtn() 메서드를 호출한다.
선언부를 보면 알겠지만 pressBtn()는 비동기함수임을 알 수 있다. 따라서 Notifier 도 AsyncNotifier 를 사용하였다.
pressBtn() 메서드는 Notifier 의 state 를 대기상태로 만들고 1초 기다린 후, state = AsyncData(count); 를 실행한다.
state 가 1초동안 대기상태였다가. state 에 count 변수의 값을 저장하는 셈이다.
state 가 변하고 있기 때문에 ButtonNotifier 를 노출하는 buttonProvider 를 listen 하는 다른 위젯 - listener - 은
state 가 변할 때 state가 변했음을 통보받는다 (event 발생).
그러면 listener 는 자신의 build 메서드를 재실행시킨다. (rebuild) (2024-04-17 삭제 및 설명 보완)
state 가 변했다고 해서 listener 의 build 메서드가 재실행되지는 않으며,
해당 state 를 listen 중인 위젯들이 다시 렌더링된다.
build 메서드는 invalidateSelf 등으로 state 값을 초기화 했을 때 다시 실행된다.
마찬가지로 state 가 변했다고 하여 Notifier 의 build 메서드도 재실행되지 않고, (해당 Notifier 를 노출시키는) Provider를 listen 하는 위젯이 위젯트리 상에 존재할 경우 Notifier의 build 메서드가 1회 실행되는 듯 하다.
참고로 AsyncNotifier 가 아니라 정확히는 AutoDisposeAsyncNotifier 를 사용했는데, 화면을 나갔다 들어왔을 때 다시 count 변수가 5로 초기화되게끔 편의상 추가한 옵션이다.
AutoDispose를 간단히 정리하면 더이상 사용이 되지 않으면 자동으로 폐기(dispose)되도록 하는 옵션인데,
지금은 화면을 나가면 AutoDIsposeAsyncNotifier 인 ButtonNotifier가 폐기되어 사라지고,
다시 화면으로 돌아오면 ButtonNotifier 를 사용해야하므로 ButtonNotifier 의 build 함수가 실행되며 ButtonNotifier 의 초기화가 이뤄진다.
dispose 에 대한 자세한 설명은 다음 포스팅에 정리할 예정.
아래는 위의 코드의 build 메서드에 마우스를 올려놓으면 볼 수 있는 주석 설명문이다.
Initialize an [AsyncNotifier].
It is safe to use [Ref.watch] or [Ref.listen] inside this method.
If a dependency of this [AsyncNotifier] (when using [Ref.watch]) changes, then [build] will be re-executed. On the other hand, the [AsyncNotifier] will not be recreated. Its instance will be preserved between executions of [build].
If this method throws or returns a future that fails, the error will be caught and an [AsyncError] will be emitted.
만약, state 를 변경하지 않고 Notifier 의 데이터인 count 변수만 변경하면 어떻게 되는지를 테스트해보았다.
전체 코드에서 다른 부분은 하나도 건드리지 않고 state 를 변경하는 부분만 주석처리로 지웠다.
  Future<void> pressBtn() async {
    // state = const AsyncValue.loading();
    await Future.delayed(const Duration(seconds: 1));
    count++;
    print(count);
    // state = AsyncData(count);
  }
정상적으로 동작하는 경우
주석처리하기 전에는 UI 업데이트가 count 변수가 변하는 것을 반영하고 있다.
Notifier 의 build 메서드에서 count 변수를 5로 초기화하여 count 변수가 5에서부터 시작되어
버튼을 누를 때마다 1초 대기 후 1씩 증가한다.
AsyncData<int>(value:5) 라고 보여주고 있긴 한데,
아래처럼 TextButton 위젯을 수정하면 state 가 저장하는 값인 count 변수의 값만 볼 수도 있다.
TextButton(
child: Text("state: ${state.value}"),
onPressed: () => _countUp(),
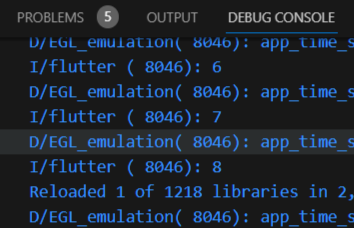
),state 를 변경하지 않고 count 변수의 값만 변경하는 경우
애뮬레이터에서 녹화한 화면이라 마우스 포인터가 보이지 않아 버튼을 누르고 있는지 표현이 잘 안되서 아쉽지만, 확실히 누르고는 있다. 하지만 UI 는 변화가 없는 모습.
print 를 통해 count 변수값이 변경되는지 콘솔로 확인해 보면 count 변수값은 정상적으로 1씩 증가하고 있다.
state 가 변하는지 listen은 하고 있지만,
정작 state 를 변화시키는 부분을 구현하지 않아서 listener 들이 rebuild 되지 않기 때문.
StatefulWidget 에서 setState 를 제대로 작성하지 않은 경우와 비슷하다.
Watch & Listen / Read 차이점
ref.watch / ref.listen
`ref.watch` 메서드는 provider를 받아 현재 상태를 반환합니다. 그러면 리스닝된 provider가 변경될 때마다 provider가 무효화(invalidated)되고 다음 프레임 또는 다음 읽기(read) 시 다시 빌드됩니다.
수신 중인 provider가 변경되어 요청이 다시 계산되면 새 요청이 완료될 때까지 이전 상태가 유지됩니다.
동시에 요청이 보류(pending)되는 동안 "isLoading" 및 "isReloading" 플래그가 설정됩니다.
이를 통해 UI에 이전 상태 또는 로딩 표시기를 표시하거나 둘 다 표시할 수 있습니다.
모든 상황에서 .watch 를 사용하는것은 지양
-> 'listener' 의 콜백함수나, notifier 의 메서드 등에서 watch 를 사용할 경우 watch 구문이 실행되지 않을 수도 있다.
("Meaning any code that is possibly not executed during the build phase of the provider")
-> 이를 위한 .watch 의 대체제로 ref.listen 를 사용해야한다.
ref.listen state 가 변하는지를 listen 하는 것은 ref.write 와 동일하지만,
state 가 변했을 때, 콜백함수를 실행하기 위한 용도로 사용한다는 차이가 있다.
ref.read
watch/listen 과는 달리, Provider 의 state 를 한 번 읽고 그 이후로 state 가 변경되었는지는 리스닝하지 않는다.
notifier 의 메서드에 엑세스하기 위한 용도로 주로 사용한다.
이 옵션은 provider의 현재 상태를 반환한다는 점에서 `ref.watch`와 유사합니다. 하지만 `ref.watch`와 달리 공급자를 수신(listen)하지 않습니다.
따라서 `ref.read`는 Notifier의 메서드 내부와 같이 `ref.watch`를 사용할 수 없는 곳에서만 사용해야 합니다.
provider에서 `ref.read`를 사용할 때는 주의하세요. provider를 수신(listen)하지 않으므로, 해당 provider가 수신(listen)하지 않으면 상태(state)를 파괴(destroy)할 수 있습니다.
상태를 파괴~ 이 부분은
자동으로 폐기되도록 옵션을 넣어서 provider 를 생성했을 시, read 만으로는 자동폐기를 막을 수 없다는 의미이다.
'Development > Flutter' 카테고리의 다른 글
| [RiverPod] 2. State disposal (1) | 2024.02.10 |
|---|---|
| [Riverpod] 0. Riverpod overview (1) | 2024.02.10 |
| Flutter 시작하기 (VSCode) (0) | 2023.09.05 |
| Flutter 개발환경 구축 (Ubuntu) (0) | 2023.09.05 |

